Photography: Tips for Better Pet and Kid Photos

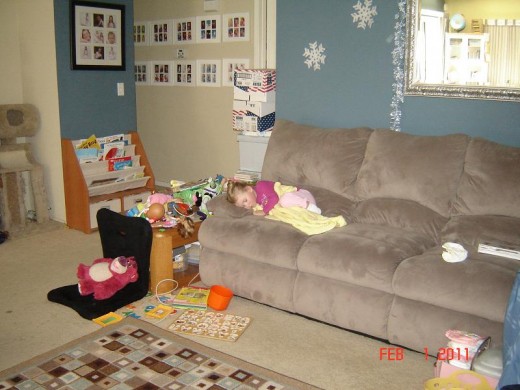
Catnap Interrupted

Go For The Candid
Whether you are trying to capture an award-winning photo of your precious child or precious pet, there are simple guidelines to keep in mind. Since I have already covered lighting, in this article, I will focus (no pun intended!) on composition.
Kids
To insure the very best photo you can, remember this: with kids, candid shots are usually better. You can capture them when they are not paying attention to or aware of the camera. This results in a very natural and informal portrait. With a candid, you capture the child's personality; the object of their interest gives you a window into what engages their mind.
Of course, if you have a child who loves to 'ham it up' for the camera, that natural-looking candid can be tricky There is a trick. Make the child think the camera is looking at something else, in the opposite direction. Hold the camera at the correct elevation for the shot, but aim it the other way. Keep watch out of the corner of your eye, and when the child has lost interest, and gone back to what they had been doing, quickly and quietly swivel the camera around and snap the shutter. By the time the child sees the flash (if used), the picture is already taken. This is a great way to capture mood shots.
I used the technique at a wedding for a shot of the bride's nephew. He was about 9 years old, forced to be in 'fancy clothes,' and of course had been admonished to be on his best behavior. He was bored to death, and the look on his face plainly said, "I'd rather be in school, even, than here." He was seated, looking down at the floor, with a mournful expression.
At the time, I had a manual-focus camera, so I sat down about 5 feet away, pre-focused the camera on something about that distance in the other direction. Since he was looking down, I knew I'd need a low-angle shot to capture the mood, but did not want to attract his attention by getting down on the floor.
I stayed seated, made it appear that I had set the camera in my lap, then slowly swiveled it around to rest on my hip, made my best guess from experience on lining up the lens, then, looked away, and slyly pressed the shutter. It was a classic. My then-sister-in-law said it was the best photo anyone had captured during the entire wedding and reception!
Pets
Similarly with a pet--if you snap that photo of your pooch engrossed in a game of tug-of-war with another family member, or even another dog, you are getting that very natural and involved, intent expression.
Trying to pose a pet for a formal portrait can be a challenge, especially if you have a very curious animal who wants to see what the camera is all about, and keeps moving ever closer until you have an up-the-nose shot.
Formal portraits work best with very well-trained pets who know what "Sit, Stay!" means...great for dogs; unlikely with cats.
Unless the cat is sleeping, or getting ready for a nap, they are not likely to hold still for long. You have to be quick, keep your camera handy to grab and be aware of your kitty's likely targets of interest, whether it be staring out the window at birds, or batting at a toy while lounging on the rug.
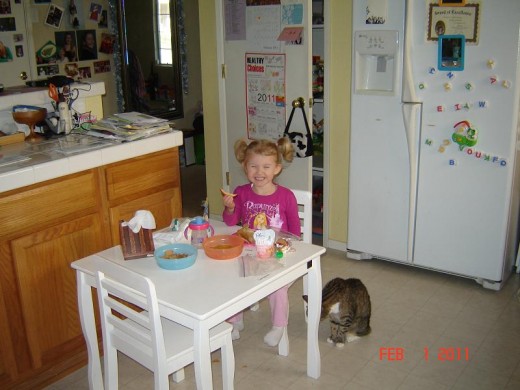
Cats: Be Quick or Lose the Shot


It's All In the Angles...
I'll bet you thought you were finished with angles after the lighting post. Guess again. It's all about angles. Every single photo you take has to be shot from some angle or another. It can make or break a photo; be the difference between a great photo, a so-so photo or a truly regrettable one.
Naturally, there are photos taken for "artistic effect," or to make some kind of statement that take odd viewpoints, and look at things from a skewed angle to create a specific mood.
The same principle applies to shooting video, not just stills. Think MTV style video--all sideways and jerky with speed-zooms in and out-- appeals to some; I hate it. It makes me, and many others, almost get motion sickness, especially when they overuse the technique.
A View Too Far
Move in Close, or Use the Telephoto Setting

Hit the Deck!
The same principle applies in still photos: if you want a photo of your pet or child, then that is what you want to show; not a little dot of kid in the middle of a huge expanse of carpet, or a wee tiny model of a Great Dane in a sea of green grass. Move in close! Fill the camera's viewfinder or view screen with your subject. If you cannot move close for whatever reason, that is what the zoom feature is for. Pre-set the zoom until you have the close-up shot you need, then press the shutter button.
Note that the zoom function acts like a telephoto lens. Not only will it make your subject appear closer, it will also greatly magnify any vibration or shake in holding the camera, so be sure to use a tripod, or set the camera on a solid surface such as a table, the floor, or a stack of books--whatever will provide the appropriate height to capture your subject.
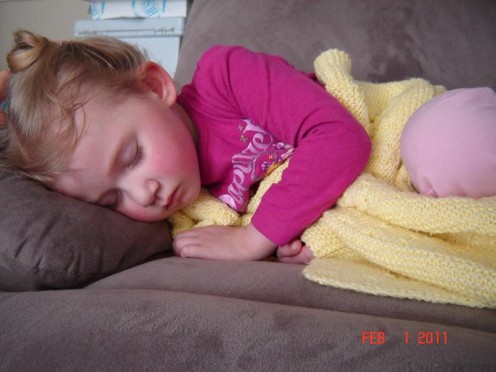
For either pets or kids, the very best shots are taken at their eye level. Yes, if you are serious, this can mean some time spent lying on the floor or ground on your belly. Eye-level shots, however, best convey the action and personality.
Compare the 4 photos above, for example. Notice how in the top 2, it takes a moment to figure out what or who is the subject of the photo.
Now look at the bottom 2. No doubt remains.
I've also included a video from YouTube that shows a cat at play. Maru is quite the ham and well known on both YouTube and Face Book.
Note the camera angle. Maru's owners know that kitty-eye-level best captures not only the action, but the cat's expressions, and place the camera on the floor.
In this particular video, the pile of the shag rug adds to the intrigue and mystery of the hiding cat, while the floor serves as a level, stable surface for the camera. There is no camera shake or wobble to make you seasick.
Maru is "Famous" on You Tube and FaceBook
Off With Their Heads??
Do you have a reputation for chopping off people's heads in photos? It is a common problem, and has been ever since the first consumer-level snapshot camera became available. The problem is a pesky little thing about angles called parallax.
Parallax is the difference between the angle to the subject of what the camera's lens sees, and what you see with your eyes while looking through the viewfinder. It is not a great distance, but it is enough to cause a problem if you don't know how to compensate. For a fast example of how this works, pick out something across the room to look at. Now, close first one eye, and then the other, without moving your head or yourself. Notice how the object seems to 'jump' or shift to a slightly different spot? Or, you may experience this more as, one eye sees it straight-on, while the other sees it from a slight angle.
Binocular Vision--It's How We See
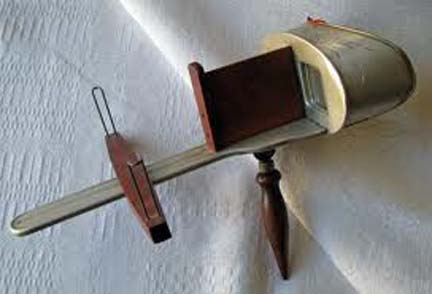
This difference in angle-of-view between each eye is what gives us our ability to perceive depth in three dimensions. It is also the principle behind the antique stereopticons, which used a pair of apparently identical photos mounted on a board. The viewer held the device up to their eyes, looked through the magnifying lenses, and beheld what appeared to be a full three-dimensional image.
In fact, the photos presented were taken from very slightly different angles, with a special camera, (2 lenses, just about eye-distance apart), and the resulting photos were then mounted on card stock for insertion into the slot on the viewing device in front of the lenses. The wooden divider on top of the mounting rod blocks your view of the small gap between the two photos. There was some front-to-back adjustment to allow for differences in people's eyesight, and voila! The images appear as one.
An Old-Style Photo Viewer Works the Same Way
Fixing Parallax Issues
The fix for this parallax problem is easy. When looking through the viewfinder of your camera, step back a bit farther from your subjects (especially people), and allow more empty space, trees, wall, (or whatever surroundings you are in), both above the heads and to the sides. Unless you are trying for a full-length photo to show off an entire prom dress and shoes, chopping off feet is usually considered less of a photographic sin than decapitating folks.
And by the way--if you want that full-length shot, stop backing up until your subject fits head-to-toe in the view screen! Today's digital cameras follow the 35mm format, with rectangular-shaped images, wider than tall, and not square like many of the old cameras. If you back up until your subject fits the horizontal format, you'll be too far away, and end up with a "who or what is that?" shot.
Turn the camera instead 1/4 turn (90°) either to the right or left, whichever is more comfortable for you, thereby using a vertical format. The photo is easily righted in any basic photo-editing program, including the free ones offered online.
Technology To the Rescue
With the advent of digital cameras, and especially the newest ones with large view screens, it is becoming easier to avoid parallax problems. The view screen cameras give you a WYSIWYG (What You See Is What You Get--pronounced as if a real word, "wiz-ee-wig") view.
Likewise, many of the 35 mm film cameras used a special mechanism to allow that WYSIWIG view. This was a mechanism in the truest sense: it was an actual mechanical device inside the camera that moved mirrors and gates to allow you to actually see through the camera's lens. It is also why as you snapped the photo, the viewfinder opening became blocked, as the mirrors flipped up out of the way to expose the film.
This type of camera was called a "single-lens reflex" type, or SLR; other old-fashioned cameras used an entirely separate viewfinder and lens, and were called "twin-lens reflex" types.
Camera Styles, Old and New


Blurry, Out-Of-Focus Photos
Another reason many folks have trouble with accidental cropping is jerky camera movements. Some people seem to think that the shutter button must be very firmly and rapidly depressed to operate the shutter.
In doing so, they almost always move the camera as they snap the photo. This can easily result in missing heads or limbs. It is also responsible for many blurry photos as the camera is fast enough to see that motion and dutifully records it.
The camera doesn't know you didn't want things to look as if they were moving.
Tripods Are Not Just for Professionals:
The best solution in both cases is to use a tripod. With the camera firmly mounted on a stable base, the shot can be very carefully composed and all of everyone can be included. Also, any accidental motion is prevented.
As an additional precaution against camera shake, you can consult your camera's manual for how to do a self-timer photo. The camera is set on the tripod, you press the shutter button, but there is a delay you may program of 5, 10, or 15 seconds (depending on your camera's capabilities.)
With the shutter button already pushed, the camera is on automatic, counting down, and there will be a perfectly still photo. Now you just have to make the kids and pets hold still! As a bonus, this feature even gives you, the photographer, time to scramble over to the group and be included in the picture.
If the photographer has a shaky hand, a tripod is essential. Some people are so prone to shakiness that they even manage to shake a tripod! If the camera has no self-timer, then someone else should take the photo (assuming a group shot, and not a solo photographer out shooting alone).
Cable Release:
Some high-end cameras have a screw port on top of the shutter button. This is a port that accepts what is called a cable release. It is a piece of flexible cable within a flexible tubing. The internal cable ends in a plunger, much like a hypodermic syringe. the other end screws into the shutter button.
Essentially, it is a primitive form of remote control, being manually operated; mechanical instead of electronic.
Simply press the plunger when you are ready to snap the photo. No shake, because you are not touching either the camera or the tripod: a shaky hand on the cable release will not affect the shot.
Avoid the Dreaded Evil Eye!
We've all seen those creepy-looking photos in which the subjects eyes are glowing an eerie red or green. (Red--people; green--cats and dogs.) Such pictures are wonderful--for Halloween effects. For the most part, however, this is undesirable. This is always caused by on-camera flash, and it is a form of flash bounce, (discussed in my article, "Photography: Lighting for Best Pictures.")
In dim light the pupils of our eyes enlarge, to allow more light in so we can see better. Shining a bright light into the eye, even momentarily, will cause the pupil to react by beginning to contract. You see this all the time in emergency or disaster type movies, when the medical personnel shine a small flashlight into an unconscious person's eyes. They are checking for this reaction to determine brain function. That much of what you see on TV is based on fact.
Like many other photographic problems, it is simple to prevent. Check your camera's manual. Most newer digital cameras have a red-eye prevention mode on the flash. Set the camera to this mode, and snap away.
Here's how it works: The eye will react, but it cannot do so faster than the shutter speed of a camera, hence the red-eye phenomenon. The 'anti-red-eye' mode sets a timer on the flash, and "pre-flashes" several times prior to triggering the shutter action. These rapid bursts of light affect the eye, causing the pupils to shrink to a bright-light state, and when the final flash burst (coordinated to the shutter mechanism) goes off, the pupils are still contracted, and, voila! No red-eye!
This setting can work on animals, but is trickier, as the pre-trigger flash bursts are liable to alert the pet, and cause them to move to investigate. Or maybe they will just put a paw over their eyes. Oh, well..that's a cute shot, too! You have to know your pet well enough to know how they will react.
Best bet for pets: avoid using flash when possible, and if you must, don't shoot straight-on, but take an angle shot off to one side or the other by just a bit.
Keep Shooting!
Remember, it takes patience and practice. Keep your camera handy, and take photos at every chance. Snapshots are grabbed in a hurry; portraits must be planned, including the sneak-attack of candids--there is a difference between a candid portrait and a hurriedly snagged snapshot.
Your key principles in review are these:
- Stay as close to your subject's eye level as possible
- watch your angles
- use the red-eye reduction feature for flash
- hold camera steady, or use a tripod or solid surface
- compose in the view screen, and watch for parallax issues
- depress shutter button firmly, but slowly and smoothly
Happy photos!
© 2011 Liz Elias


